Mulberry
- Supports user login as of version 1.4.
- Supports multiple LDAP server choice as of 1.4.
- ClickMail and Mulberry have been reported to freeze on some Macs (OS 8/9) if Mulberry is running on the same Mac as ClickMail and does an LDAP lookup. There is no problem when run on a different Mac than ClickMail.
Setup
- From the File menu, choose Preferences. On the left side of the Preferences window, click Addresses.
- From the Account pop-up, choose New. Enter any name to refer to your ClickMail server. Click OK.
- In the Server field, enter the host name or IP address of the Mac running ClickMail.
- Examples: ldap.mydomain.com
123.45.67.89
- Leave Root blank. The other fields specify LDAP attribute names understood by your server. If desired, for Address, phone, and Fax, enter postalAddress, telephoneNumber, and facsimileTelephoneNumber.
- To have all other attributes read and captured in the notes field, check the box Put Attributes in Notes.
- Mulberry 1.3 searches all LDAP servers when you search, listing the results from each server separately. Therefore, another LDAP server may be searched before ClickMail. To avoid this, you may delete the Test Server or other LDAP accounts in the pop-up. Choose the other account from the pop-up, then choose Delete from the pop-up.
Search
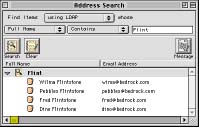
- From the Addresses menu, choose Search. This opens the Address Search window.
- In the window, from the find Items pop-up, choose "using LDAP."
- Enter a full or partial name in the text field. If desired, change the Contains pop-up to another option.
- Click the Search button. A list of returned entries appears under the name you entered, outline-style. If you search again, the results are added to the list under another entry header.
- To see the details of an entry, double-click it.
- To add an entry to an address book, drag it to an open address book (icon or window).
- To address a message, from the File menu choose New Message. Drag any entry from the search list to the To or other field in the message window.
