Configuring ClickMail for web administration
 |

|
Web administration login is password protected, and limited to designated administrators. To have access, you must become an administrator in ClickMail.
 To enable web administration, choose Preferences from the Edit menu. Under Web Admin Access, check the On checkbox. If desired, change the web session timeout. This sets the time that ClickMail waits after the latest web administration command before automatically ending the session. After the session ends, the administrator must log in again to do more work.
- In your own entry, add a password attribute with your administrator password (choose "password" from the attributes pop-up menu). Save your entry.
- Warning for AppleShare IP integration: When ClickMail is run in AppleShare mirror mode, password attribute values are also set in AppleShare. If you enter a different password in ClickMail, you are changing your AppleShare password! If you are the AppleShare IP administrator, you need this password to access local AppleShare IP Web & File Admin. ClickMail itself must have an AppleShare IP Administrator password to connect to AppleShare. Do not unknowingly change or forget your administrator password.
If you want to use a different password for web administration than your AppleShare password, enter your AppleShare password in the password attribute, then click Add Value. Enter your web administration password as the second value. Either value can be used for web administration logins, but only the first value is stored in AppleShare.
In AppleShare mirror mode, the synchronization function updates passwords only in ClickMail entries that already contain a password attribute, unless the "Copy passwords from ASIP Users & Groups" preference is checked. Only the first password attribute value is updated.
- Security note: Your password is not encrypted or secure when you log in unless you run ClickMail under SSL encryption provided by your web server and browser.
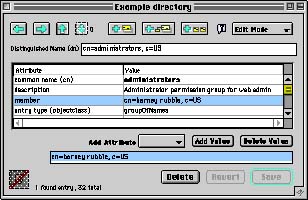
- From the Entries menu, hold down the option key and choose Add Group.... This creates an "administrators" group entry with the correct name and attribute values. The distinguished name for this entry must be cn=administrators followed by your naming context (such as c=US).
- In the administrators entry, select the "member" attribute. From the Entries menu, choose Paste DN.... Double-click your name in the list that appears, which enters your distinguished name as a member. Save the entry.

Group entry "cn=administrators" specifies the web administrator(s).
 To enable web administration, choose Preferences from the Edit menu. Under Web Admin Access, check the On checkbox. If desired, change the web session timeout. This sets the time that ClickMail waits after the latest web administration command before automatically ending the session. After the session ends, the administrator must log in again to do more work.